Key Links.
Link to computational server. If you don’t know the username/password ask Simon.
Link to new fingerprinting tool. No password needed.
Both of these links will only work on campus. Both require you to pre-gate your fingerprints and export the events you care about (cells?, B-cells?) to a CSV file. You can normally do this in your favourite flow cytometry software.
How to go from an FCS file to a CSV file without FlowJo.
- Convert your FCS file to a CSV file of events
- Go to FloReada
- Upload your FCS file (drag and drop will work.
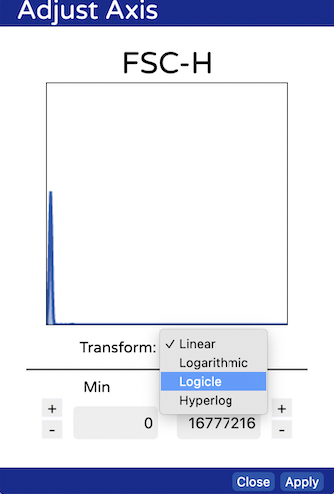
- Set the axes on FSC and SSC to “logicle” by clicking on the axes and choosing it from the drop down.
- Create a polgygon gate around your cells

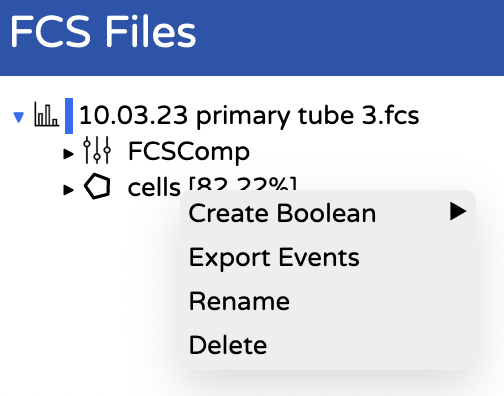
- Export the cells by right clicking on your gate and choosing export events
- Save this file somewhere sensible and repeat for all FCS files you want to analyse (each condition and replicate).
How to generate fingerprints
Generate fingerprints using an interactive website (the easy way).
- Access the fingerprint interface. Link to new fingerprinting tool.
- Name your x and y axes to reflect the proteins you’d like to make fingerprints for
- Click the “plus” to upload your first fully stained experiment.
- Once the file is uploaded select the appropriate columns for each axes using the two drop down boxes.
- Click the “plus” button to upload the matched unstained control for this experiment
- Once the file is uploaded select the appropriate columns for each axes using the two drop down boxes. Once you’ve selected the second column a fingerprint should appear.
- You can now repeat this process for as many fingerprints as you want to combine.
- Use the Edit tab to change the colour of any fingerprints or delete any you didn’t want in your plot
- Use the Tune tab to change line thickness, number of lines, whether you want the MFI plotted, change from 2D to 3D, and more.
Generate fingerprints using Julia code and our server (the hard way, but more control and easy to reproduce results).
- Login to the computational server with the fingerprints user. Link to computational server.
- Click on your user folder.
- Drag and drop the CSV files you created into your folder and click upload wen asked.
- Open “Fingerprinting.ipynb”
- Follow the instructions in the file, which will tell you how what to change based on your plotting requirements. Use shift + enter to run each cell.
- When you run the final cell it will generate your fingerprints. You can copy and paste these out of the notebook you’re running or they will be saved in your user folder and you can download them.